Tuesday, November 30, 2010

Count Down Calendar #2

This is our second Count Down Calendar, the one with all the goodies in it :-D (link to the first one is here). Bubble has been helping me make it over the last three days at craft time, I thought she'd get bored with the repetition of the same thing 24 times but she really got into it. We also now have about 100 left over paper doilies that she's been delighting in painting and drawing all over!

WE USED:

* brown paper bags
* glue
* christmas themed serviettes
* scissors
* paper doilies
* white paper patty pans
* marker/texta
* paper clips
* twine
* white card (to write daily activities on)
* items to go in your bags
* holepunch
* sticky tape

I bought a pack of Christmas serviettes very cheaply to use as the backing paper, but wrapping paper would work just as well.

I cut the serviettes into four before gluing them to the front of the brown paper bags.

Then we glued paper doilies over the top of the serviettes.

We used a red Sharpie to write our numbers on, but stickers or stamps would look great.


I had some white patty pans there which I had originally planned to use instead of the doilies and Bubble was very excited about squashing them so we included a few of those too! :-)


Then I put a piece of tape in each top left hand corner, folding it over both sides.

And punched a hole through the centre of the tape using a mini hole punch.
The tape reinforces the hole in the paper bag so it's less likely to rip (I hope).


I tied knots along some twine and used 3M hooks to string it along the wall, then attached these hooks made from bent paper clips.


In each bag I put; a white card with a different Christmas activity on it and a small treat. Every third bag has something edible (white Darrel Lea jellybeans) and the other contain things like self inking stamps, foam aeroplanes, Christmas stickers, whistles, bouncy balls, craft supplies etc...
It doesn't have to be expensive to be fun, all up the things for our calendar cost $15.


Best toys for toddlers

Monday, November 29, 2010

Christmas Count Down Calendar

We actually have two count down calendars this year, a simple one for our little daily treats and activities (I will do a separate Blog post about that one) and this one that I finally finished last night - just in time!

WE USED:

* medium size canvas
* white paint
* felt sheets
(we used green, brown, red, yellow and white)
* cicular object to trace
(I used the top of a drinking glass)
* air drying pen or similar
* strong craft glue
* scissors

I used the top of a drinking glass to cut 23 green felt circles and one white one. They were then glued in a Christmas tree formation with the white circle on top on a medium size painting canvas (I had to give ours a few coats of white paint because it was a repurposed canvas from another painting I'd done).
I used an air erasable pen to do the templates on the felt, they are great as all the lines fade afterwards leaving you with clean felt/fabric.

The trunk I drew freehand and glued underneath.


Using the red and white felt I then made 24 small ornaments to go on the tree including a yellow star for the top. The ornaments were cut freehand and glued together.

There is one ornament for every circle on the tree. Each day your child can add one more until they get to the white circle at the top where the yellow star goes - then they know it is Christmas Eve!


Bahaha! I have just hung the calendar on the wall to be informed by Mr Bubble&Squeak that I left off two circles! It was a late night last night :-D Here is our modified calendar with two white circles added underneath the tree for two presents:


Our modified tree with two presents underneath to bring the total up to 24! :-)

Some links for some other great Advent/Count Down Calendars:

Be A Fun Mum
Time For Play
Love and Lollipops
My Delicious Ambiguity
Picklebums
House Of Baby Piranha
Harveys At Home

I will post more links as I come across them :-)

“Come over to play at the Childhood 101 We Play link up”

We Play

Best toys for toddlers


Sunday, November 28, 2010

Coloured Water Play

I loved this post on House Of Baby Piranha about Magic Colour Drinks awhile ago and wanted to try it out as a water play activity. It was finally warm enough today to have a go and it was very popular! Bubble didn't drink her coloured water but had an absolute ball watching the colours and then mixing them together.

WE USED:

* plastic cups
* plastic cutlery
* food colouring
* tub/bucket of water
* small jug

A spot of food colouring in the bottom of each cup.

I set out a large tub of water and a small jug so that Bubble could practice scooping and pouring. The cutlery was just for extra play value as Bubble had decided she was 'making a picnic' :-)


Once all the cups were filled Bubble started mixing them together to make other colours.

Saturday, November 27, 2010

Indoor Sheet Painting

A little while ago we did some sheet painting on the balcony which the girls really enjoyed, and today we did a remake of an indoors version. It's very simple, easy to set up and then clean up, and a lot of fun.

WE USED:

* floor rug
* waterproof tablecloth or similar (dropsheet, tarp etc)
* waterbased paints
* old bedsheet (the lighter coloured the better)
* mixing cups
* paintbrushes
* water

Cover a floor mat with the waterproof tablecloth/drop sheet.

Then cover again with your old sheet. Tuck in the edges so you are left with a big canvas for the kids to paint on.

Water down some washable paint or alternatively use water and food colouring.

Let the kids go wild with their paintbrushes.
When they are done painting the sheet can just be put through the wash and reused again and again.


Friday, November 26, 2010

No More Drips

With the warmer weather arriving there is one thing I've made sure to pack into our day bag when we go out for the day; Bubble's icypole drip catcher. She is very particular about messy things and when the inevitable happens and her icypole or icecream starts to drip we end up with waterworks. So that we don't have to bypass 'icycolds' (as she calls them) all together I made a simple cup that slides onto the bottom of her icypole stick to stop any wayward drips touching her hands.

WE USED:

* plastic cup
* scissors
* knife or craft knife
* teatowel or similar

Using a knife pierce the plastic cup about three quarters of the way down. Using this slit as a starting point cut all the way around using scissors. You can make your drip catcher as deep as you like by trimming more or less of the sides, but since my girls only eat Paddlepops and they don't have much room at the bottom of the stick I have made ours quite shallow.

Place the cup bottom on top of a tea towel that has been folded several times (so that the knife tip doesn't damage your work surface) and then pierce the base right in the centre for the icypole stick to go through.

If you have an icypole stick on hand it's a good idea to work it through the holder as it can be hard to use the first few times until the plastic becomes 'worn in'.

Thursday, November 25, 2010

Bottle Bracelets

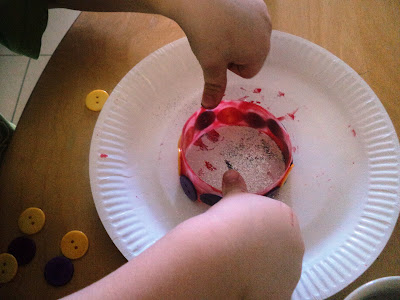
Yes, another craft project involving bottles. What can I say, I like my malted milk :-D Today I cut rings from the centre of a couple of bottles and Bubble made them into beautiful bracelets. This activity worked even better than I was hoping and we'll be doing it again, I think with some sparkly gems and sequins next time!

WE USED:

* empty milk bottles (we used the smaller size flavoured milk bottles)
* scissors
* craft glue (or 'gloopy glue' if you're a Mr Maker fan ;-D)
* paint and brush
* items for decorating (we used buttons and glitter)

To get our bracelet rings I cut off the top and bottom off the bottles, then cut the centre section in half. If your bottle is too big around your childs wrist you can cut one side of the ring and adjust the length, then secure with tape or similar.

We mixed our glue and paint together so the embellishments would stick to the plastic well. Use a large quantity of glue to paint. We used the bottom section of our bottle to hold our paint.

One of Bubble's creations.


Bubble turning her bracelet to add more glitter.

Beautiful!

She decided the top of the bottle looked like a volcano and painted it red as well :-)

Bubble modelling one of her new accessories.

“Come over to play at the Childhood 101 We Play link up”

We Play