Showing posts with label Balloon Crafts. Show all posts

Monday, September 26, 2011

Things That Fly

This game was a fun way of teaching the girls about 'things that fly' as well as working on some fine motor skills. We did it outside where there was a slight breeze this morning, so our balloons went an extra long way!

WE USED:

* balloons
* pictures of things that fly
(we just drew some on paper but stickers would work great too)
* sticky tape

The girls and I made a list of 'things that fly' and I traced some pictures to use for our game. Stickers would work just as well or better if you have them!
We cut out each one and attached a small piece of tape, then the girls took turns choosing a picture for their balloon.

We blew up our balloons and held them closed without tying them off. We found the side of the balloon was the best place to put the pictures so we still got a lot of height when we let the balloon go.


Tuesday, May 17, 2011

Balloon Powered Boat

I have so many posts to catch up on in here, I'll do my best to get through them over the weekend! We've had two sick little girls with the flu bug so not as much craft action as usual, but these balloon powered boats were a big hit today while we (finally :-D) enjoyed some nice warm weather.

WE USED:

* rectangular plastic container
(we used a cornstarch food container, but an empty margarine/ice cream container would work well too)
* sharp knife/craft knife
* drinking straw
* balloon
* sticky tape
* small elastic band
* scissors
* blu tack/sticky tack


First use your knife to make a small hole in one end of your container just big enough for your straw to fit through.

Cut your straw in half and attach the balloon to one end using sticky tape and the elastic band. It should be secure enough that you can use the straw to blow up the balloon without it leaking around the sides.

Thread your straw through the hole in your 'boat' making sure the balloon end is on the inside.

Use your blu tack to secure the straw on each side so it is watertight. You could also use Plasticine for this.

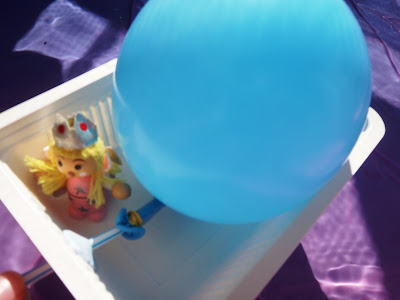
One balloon powered boat ready for the water!

Using the straw blow up the balloon and then kink or put your finger over the end so the air doesn't escape.

Place your boat in the water, let go of the straw and off it goes :-)

The girls enjoyed racing their boats around the paddling pool.


Thursday, November 4, 2010

Balloon Rockets

I know, I know, you'd have thought we'd had enough of balloons and rockets, but well... no :-D This activity was easy and quick to set up, and major fun. Both Bubble and Squeak thought the noise the balloon made when we let it go and the way it shot down the string were HILARIOUS, there were lots of giggles in our house today.

Other Ideas: Why not run two or more lines across the room and have races? I think this would be lots of fun for a classroom or party activity.

WE USED:

* thin elastic (could also use wool, string, twine etc)
* drinking straw
* scissors
* sticky tape
* balloon
* our paper rocket from our Rocket Straws activity
(this isn't necessary, we just thought it would be cool to add a rocket :-D)

On the underside of our rocket we taped a drinking straw that had been cut in half.

Then threaded our straw onto one end of the elastic.
If you are not using a rocket just thread your half straw onto whatever you are using (elastic, string, wool etc..).

Tie your elastic/string across the room, making the straw/rocket end slightly higher than the other end.

We used a kitchen chair to secure one end and tied the other to Squeak's highchair.

Tape a loop of tape to the underside of your straw/rocket (so that there is a sticky side facing out)

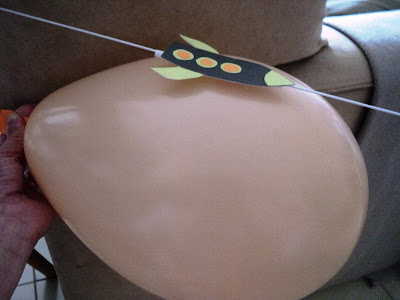
Blow up a balloon and while holding the end so it doesn't deflate press the top of it against the tape underneath the straw/rocket so that it sticks. Make sure the back of the balloon is facing backwards as shown in the photo.

Have a countdown and let your balloon go - your rocket will shoot to the other end of the string faster than lightning (well, not really, but pretty fast :-D).

One of our rocket balloons at the end of the line.

Friday, October 29, 2010

Jelly Volcano Balloons

This activity was serious fun, both girls got really involved - and sticky :-D It was a great sensory play experience; there was the feel of the jelly, the fun of watching it 'explode' as well as the taste and smell.

WE USED:

* balloons (washed in warm soapy water and rinsed)
* jelly (2 packs)
* fridge
* scissors
* large container
* kitchen utensils for play

First we washed our balloons thoroughly, rinsing them well.

Then Bubble and I made some jelly using two packs of crystals and only adding a small amount of hot water to dissolve (about a cup). It was very thick and syrupy which is what we needed.

I filled each of our balloons with some of the concentrated jelly solution using a funnel, then filled them the rest of the way with water from the kitchen tap (cover the tap with the top of the balloon like you would fill a water bomb). The balloons were then tied off and left in the fridge for a day to set.
I had no idea if I'd added enough or too much water to make them set, but figured they'd be fun to play with whether the jelly was firm or watery!

Today we took our jelly balloons outside along with some scissors and things from the kitchen.

When the tops of the balloons were cut off they literally exploded jelly out the top - Bubble was very excited and thought they were volcanos :-)
All the balloons were different consistencies which was even more fun - the watery ones exploded the best when cut and the firmer ones were lots of fun to squeeze.


Bubble enjoyed cutting the balloons herself.


Once all of the balloons were 'erupted' we played with the jelly doing pretend cooking, whisking, filling and pouring and of course tasting :-D

Using ladels to fill cups.

Squeak was fascinated and inspected the jelly very closely for a long time. She ran her fingers back and forth and kept holding handfuls up to the light.


There was lots of squishing.

And plenty of eating too :-)

Sunday, September 26, 2010

Moon Balloons

Our third activity for our 'party night' was these moon balloons (at least that is what Bubble called them). I made some party showbags for a friend's little boy this week and had a heap of glow sticks left over, so we put them to very good use. They cost $6 for a tube of 50, so this activity cost us next to nothing but was a blast!
Bubble activated each of the glowsticks by flexing and shaking them, while I blew up balloons and put a glow stick inside each one. I think this activity would be much easier with mini glowsticks rather than the big ones we had, but it was still doable. I had to blow the balloon up first and then slide the glowstick in without letting too much air escape, whereas with mini ones you could pop them into the balloon before blowing them up. The lighter coloured balloons definitely worked the best.
We made ten of the glowstick 'moon balloons' and when the lights went off the effect was incredible! The photos don't do them justice at all, they were beautiful and the girls were absolutely beside themselves with excitement :-) Bubble went nuts, racing around throwing, kicking and shaking the balloons while Squeak stood in the middle of the room just squealing with happiness for a good ten minutes before joining in.
I have been told that you can reuse glowsticks a few times by putting them into the freezer after they lose their glow and thawing them about an hour before using again. I have no idea if this is true but will give it a go and report back.

Games we played with our glowsticks and moon balloons:

* Playing catch and soccer in the dark with the balloons was very cool :-)
* I taped glowsticks around the outside of a hula hoop and held it up for the girls to throw moon balloons through - our own version of glow in the dark basketball.
* We used the spare glowsticks to make letters in the dark by laying them in different formations on the floor.
* We put glowsticks under our clothes to see the effects under different fabrics (and to run around like loonies with glowing clothes :-D).
* I put a few glowsticks inside an empty plastic bottle and Squeak loved rolling this around on the floor.
* We made our glowsticks into bracelets using the included connectors and watched the effects when we danced different actions. We put on some music and tried to make as many different patterns in the air as we could think of - the girls loved the effect made when we rolled our arms.
* With the glowsicks inside them the balloons made a great noise when banged together or on the floor.
* We took our balloons outside for some nightime fun in the cubby.
* Once all the excitement was over and it was bedtime the girls were happy to drift off surrounded by the glow of the moon balloons - the effect was really magical.

Please note: I didnt allow Squeak to have a glowstick when the lights were out in case she bit into it. Putting the glowsticks into the empty plastic bottle was a good way for her to be included safely :-)


Bubble activates the glowsticks.

The balloons were nothing special with the lights on, but with the lights off ...

It was party time :-)


The colourful blurs are the girls running around with their glow sticks and glow bottle :-D


Making letters and words with our glow sticks.


Come play at the Childhood 101 'We Play' link up

We Play