Friday, December 24, 2010

Merry Christmas and Thankyou

Here in Australia it has officially ticked over December 25th, so
Merry Christmas to you all :-)
Thankyou for all of the comments, messages, link ups and for reading along with our Blogging adventure these last few months - I am truely staggered by how many people have been visiting and from how many different locations around the world. I'll be taking a week or so to spend time with my family but will be back in the New Year to continue sharing our learning and craft activities, as well as reading up on all of the wonderful ideas shared by others.
Have a safe and happy Christmas & New Year, and most importantly have fun! xxx

Christmas Rosettes

I remember making stacks of these as a kid but hadn't given them a second thought until I saw them again recently used as party decor on Little Sooti's beautiful blog. I decided to make a couple of rosettes from some red and brown paper the kids had done chalk drawings on and despite the fact I only used two sheets instead of three they turned out great! My sticky taping skills could use some work though :-D Quick, easy and effective - my kind of decorating!

WE USED:

* paper sheets (I used a sheet of red construction paper and a brown paper bag that the kids had drawn on)
* sticky tape
* twine/wool/string
* hole punch or pen to punch hole with

Link to Making Paper Rosettes


Milk Carton House

Bubble added to her Santa wishlist shortly after writing her letter (obviously just getting warmed up :-D) to include a toy icecream, a racing car and a toy door. Yes, that does say door. Poor Santa was a bit mystified by this request and asked if I could give him a bit of a hand with it, and this is the best I could come up with!

A small sized milk carton, taped closed at the top with masking tape and painted with a few layers of white and brown acrylic. I used a sharp paring knife to slice a door (the important bit!) and a few windows into the cardboard sides to create a little house. I was going to add details with a Sharpie and maybe some felt flowers or something, but decided to keep it simple. It is now nestled amongst the presents under the tree and will hopefully pass inspection as a 'toy door' come morning :-)

Felt Christmas Necklace

Sorry I'm just a tad late posting this! We've been having a ball in the lead up to Christmas, enjoying some sunshine (finally) and spending some time at the beach in the evenings.
Our day 23 activity on the Christmas Count Down was making a necklace, which we did using felt. I cut a heap of different Christmassy shapes from red and white felt and gave Bubble a thick embroidery needle to use. Once the needle was threaded I tied a knot to secure the thread to the eye so that it wouldn't pull loose as she fed the felt shapes along the needle.
I honestly thought this activity would last a few minutes before Bubble became frustrated or bored, but she sat next to me chatting away and singing Christmas songs and threaded every single piece of felt. I love the end result, although I have been solemnly informed that it is for Daddy and not for me :-D

WE USED:

* felt (red and white)
* scissors
* large embroidery needle
* embroidery thread (red)


It looks much prettier in real life. I think this would be a nice way to make a hanging decoration or a garland as well.

Reindeer Food

I've seen so many great ideas for making reindeer food in my Blog travels over the last week, including using bird seed instead of glitter which I think is genius (if anyone has a link to any recipes that are bird friendly, please do share!). Not only does the local birdlife get a good deal but it's much more earth friendly. This recipe is another one I love, I can almost smell it from here - wonderful.
Our reindeer food was a little more simple and a lot more boring since it was only going to be scattered along our balcony, but still fun for both Bubble and Squeak to make and still magic :-)

WE USED:

* rolled oats
* glitter (silver, red and green)
* christmas themed sequins


Saturday, December 18, 2010

Feeding The Animals - Block Play

Today Bubble and I played with the girls wooden farm while Squeak had her day nap. We used building blocks to make fences and water troughs, and felt to make some food for the animals to eat. It was a great way to reinforce Bubble's knowledge about the foods animals eat and just a nice fun way to spend an hour :-)

We had pond weed for the ducks and scraps for the pigs and the chickens (we used the bits from the felt pizza toppings we made awhile ago for these).

We cut up yellow felt to make hay for the sheep, horses, cows and goat. I cut long strips and Bubble snipped them into little pieces.

And some meat for the dog - for this I cut shapes from red felt and added a bit of detail with a white correction pen (or liquid paper pen as some people might call them).

We made paddocks for all of our animals and added a blue block to each as their water.


All the animals waiting to be fed. Bubble ditched our tiny little toy tractor in favour of the bigger toy ambulance, so she could fit some Toy Story 3 characters in the back for a farm tour :-D
Sorry for the dark photo, despite being December when it should be nice and hot outside our sun seems to be in hiding.

Feeding the ducks their pondweed.


The dog liked his steaks but was full after eating only one apparently :-D

Felt Watch - Telling Time

Bubble has an on and off interest in telling the time, she gets very into it and then loses interest again. At the moment we are experiencing a resurgence so I made her this little felt watch while the girls ate breakfast this morning. The hands can be moved so we can use it at some stage to play games etc... but mostly it's just for fun!
Unfortunately the watch face turned out quite dodgy because I was trying to get it done quickly; the numbers aren't aligned properly and I sewed the whole thing onto the band on the wrong angle hehe! Bubble is still quite smitten with it though, so I'll call it a pass :-D

WE USED:

* felt
* thread and needle
* air erasable pen
* ruler
* circular object to trace
* thin wire or jewellery finding
* needle nose/jewellers pliers
* scissors
* small beads
* button
* velcro strip
* small piece of cardboard

To make the watch hands I threaded a bead onto the end of some jewellery findings and folded them over with pliers to make sure there were no sharp ends and the bead stayed in place.


The watch face was created by tracing the top of an empty bottle and then sewing on the numbers (badly, please excuse my terrible sewing! :-D). I cut two of these circles, one for the watch face (which I sewed the numbers to) and a second piece to make up the underside.
Then I laid the watch hands so that the two end circles were stacked in the middle.

The watch hands were secured by sewing on a button making sure the thread stayed inside the circles of the hands underneath. The big button on top holds them in place but there are no threads to stop them from moving completely around the watchface.

The band was created by simply cutting two rectangular strips of felt the same size.

I sewed the blank circle of felt to the centre of one band, then laid a slightly smaller circle of cardboard on top.

I then sewed on the second circle with the watch face on it. The cardboard in between the two circular layers just gives it some rigidity and shape.
Before sewing up the other side of the band I attached a small piece of velcro (hard side) to one end.

On the underside I sewed a longer strip of velcro (soft side) at the opposite end to the velcro on the top band. Then both bands were sewn together.

The finished if somewhat lopsided felt watch with moveable hands :-)

Scooping Activity - Jelly

This is a very easy activity we did today to practice the fine motor skill of scooping with a spoon. The individual blocks of the ice tray worked perfectly! Bubble doesn't actually like eating jelly but she enjoyed scooping and putting it in a bowl, and Squeak was more than happy to take over from there :-D

WE USED:

* ice tray
* pack of jelly
* spoons


Making A Santa Beard

Our day 18 activity on our Christmas Count Down was making a Santa beard, it was very easy to do and the results were extremely cute :-) Bubble was a bit put off by the feel of the cotton balls to start with, but warmed up quickly, especially when she saw that there was glue to squish!

WE USED:

* sheet of white felt
* craft glue
* scissors
* cotton balls
* white wool/string/ribbon/thin elastic
* paint brush
* air erasable pen

First I drew a beard shape on the sheet of felt using an air erasable pen, then cut it out.

Then I put a slit in each top corner by folding over a small section of felt and snipping it with the scissors. Be careful not to make the slit very big.

I then threaded a doubled over length of wool through each slit and tied them in a loop. The idea is that the loops slip over your child's ears to hold the beard on while they are wearing it. You could also use thin elastic or ribbon etc... I thought wool would be the most comfortable though.

Bubble then got (very!) busy with some glue and cotton balls.


She did a wonderful job covering every available space :-D

We then hung the finished project from some cupboard handles and it dried in a bowed shape perfect for wearing. You could also use a large drinking glass or a jar (with the beard laid over the top) for the same effect.

Thursday, December 16, 2010

Teacher Necklace Gift Update

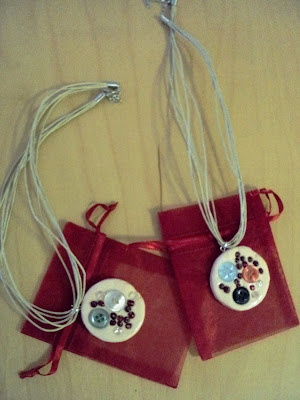
I promised an update on our clay necklaces for Bubble's teachers once they were finished, so here they are :-) I also tried out a cute wrapping idea inspired by this post on Little Sooti (third picture down). I didnt have much time so just used red craft paper and an Artliner but I'd love to try it with patterned scrapbook paper or even felt and twine.

The clay necklaces varnished and hung on their necklace strands.

We wrapped our necklaces with our handmade cards and a voucher for Gloria Jeans.

Christmas Books


Our Day 15 activity on our Count Down calendar was for each of the girls to choose a Christmas book, which we did on Wednesday. Bubble chose the Little Golden Book version of 'The Night Before Christmas' and Squeak chose 'Santa's Aussie Holiday' (by Maria Farrer and Anna Walker).
Both books were popular; not too long and really bright interesting pictures. Santa's Aussie Holiday was definitely the favourite though, we've read it so many times I almost have it memorised (no mean feat let me tell you, my memory is almost non existent!). The added bonus is that it mentions places that are very special to us which made it feel a bit personalised. The pictures were funny and the girls liked spotting different Australian animals in each one. The rhyming was also very well done, I have a big dislike for corny wording in rhyming books but this one was really entertaining!
The Little Golden Book version of 'The Night Before Christmas' kept Bubble's attention because of the pictures but Squeak wasn't quite as keen. The words are a bit 'old world' for the girls to understand, so maybe it's better for kids who are a little bit older. The subsequent few times that we read it I explained to Bubble what the unusual words meant, but of course Squeak wasn't about to listen to that :-D
Both books were also very well priced; Santa's Aussie Holiday was $14.95 and The Night Before Christmas was only $4.50 (I then saw it on Thursday at our local supermarket for $3, so check there first if you're after a copy!).