Sunday, April 24, 2011

ANZAC Day

Here in Australia (and in NZ) we celebrate ANZAC Day today, a national day of remembrance of the Australian and New Zealand Army Corps who fought in Gallipoli during WW1. It is also an opportunity to honour all servicemen, past and present, and their families for the sacrifices they have made (and still make).
The red poppy is often worn in honour of our ANZAC'S, so last night I made some wearable poppies for my girls to use today. They were very simple to make and a very cute way for them to show support, even if they don't fully understand the magnitude of what today means. Our girls are too little to learn about history in any great detail yet (particularly conflict and war) but they are not too young to be grateful for the wonderful country we live in.
On our daily walk today we were lucky enough to come across quite a few ex servicemen in their uniforms and medals, going to or returning from services and functions. Some shook our girls hands, some patted their heads and all of them smiled at Bubble's sincere "thank you for my happy Ansac (ANZAC) Day".

WE USED:

* red and green felt
* embroidery thread and needle
* black metal snap fasteners (or black buttons)
* superglue
* scissors
* metal hair clips or slides

First cut petal shapes from your red felt. I cut five for each poppy clip.

Arrange them into your flower shape making sure they all overlap at least a little and meet in the centre.

Sew the petals together in the middle using embroidery thread. There's no need to be very neat or make too many stitches (as you can see, I'm a very novice sewer!).

I used black metal press studs for the next step but you could just as easily use a black button, large beads or black felt.

Push through the top press stud making sure all the petals are included in the centre before attaching the bottom plate underneath (I just use pliers to push the two sides together).

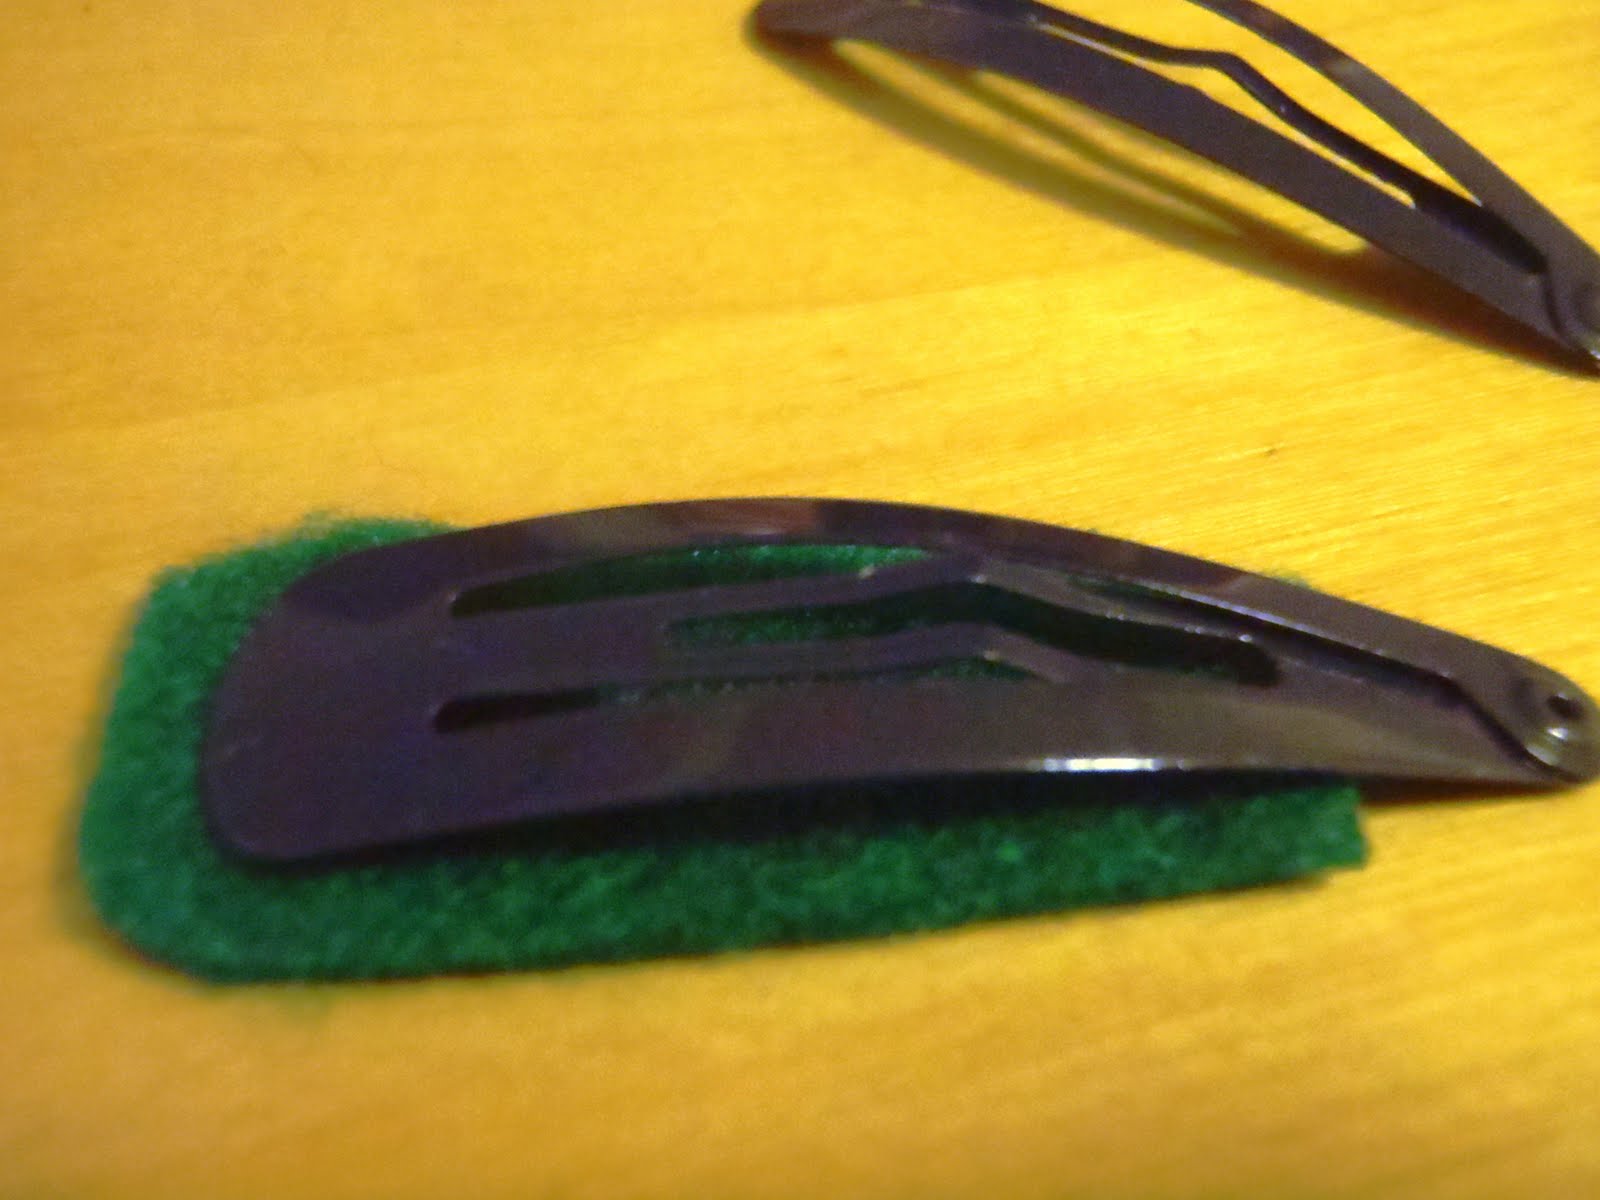
On green felt trace around the end of your hair clip/slide (x 2, one piece for each side) leaving some space around the edge to sew the two halves together.
On one half attach the other side of your press stud before gluing and stitching the two sides onto your clip (if you used a button or bead for the centre of your poppy then sew the flower directly onto the green felt instead).

In this picture you can see the two sides of the clips, with the press stud on the top. I glued the felt before sewing it securely, just make sure you don't cover too much of the clip so it still opens and closes.

Attach your poppy using the press studs.


Ode of Remembrance
(taken from Laurence Binyon's poem "For the Fallen")

They went with songs to the battle, they were young.
Straight of limb, true of eyes, steady and aglow.
They were staunch to the end against odds uncounted,
They fell with their faces to the foe.
They shall grow not old, as we that are left grow old:
Age shall not weary them, nor the years condemn.
At the going down of the sun and in the morning,
We will remember them.

Friday, April 22, 2011

Happy Earth

For Earth Day yesterday we did a simple sorting activity similar to our "How Do I Feel" game. Since Bubble is so young I kept the concepts simple, such as; 'recycle and reuse', 'walking instead of driving our car' and 'planting trees' for some of our happy earth statements and 'wasting water', 'throwing our rubbish on the ground' and 'not taking care animals and wildlife' as some of our unhappy earth statements. For older children you could use more complex ideas or even focus on one topic such as pollution or looking after the ocean.
I wasn't sure if Bubble would be very into this activity but we've played it five times over since yesterday afternoon, so I think it was a success!

WE USED:

to make our earth faces:

* paper plates
* blue food colouring
* paint brush
* green paint
* permanent marker

For the game:

* paper plate earth faces
* blutack (or sticky tack)
* statement cards
(made by cutting up speech cards and writing statements that have a positive and negative impact on the Earth. We made seven for each but you could do as many as you like!

Our Earth faces were made by painting paper plates with blue food colouring to get a watery effect, then adding green paint after it was dry.

We then drew on our faces with permanent marker
and stuck them to the wardrobe door with blutack for our sorting activity, but this could easily be done on a table top or the floor too.

I read out our statements one by one and we talked about what each one meant and which side it should go on.
Some Bubble found easy, such as 'looking after animals and wildlife' and 'wasting our food'. Others were harder such as 'using lots of chemicals in our home' and 'conserving our water'. This game was such a great way to introduce lots of topics to Bubble that we had never discussed before without the whole thing being overwhelming or too confusing. She could identify with the Earth feeling 'happy' or 'sad'.


Monday, April 18, 2011

Footprint Earth

Bubble is at Kindy today so Squeak and I did an easy little painting project for Earth Day together. Ordinarily Squeak isn't overly interested in painting and drawing projects, but this one involving feet and paint was a big hit with her (and the results are so cute too).
I think this activity would look fantastic done on a larger scale with even more kids involved!

WE USED:

* blue and green paint
* tape
* scissors
* newspaper or drop cloth
* shallow dish or box for paint
* paper/cardboard to make a large circle

(we made our circle by taping together sheets of recycled office paper and then using this method of drawing a circle with string and a pencil. I just held the loose end in the centre of our paper rather than using a tack though).

After we had made our large paper circle using the method linked above we squirted blue paint all over it and used our hands to cover it all over. Squeak loved this part and squelched the paint gleefully through her fingers and even used her elbows to spread it across the paper.

We left the circle to dry (while Squeak had a bath!) and then squirted our green paint into a shallow casserole dish for the second part of our earth painting activity.
Squeak really enjoyed squishing around in the green paint with her feet and then running across our 'Earth' to make her little patterns.


She worked out how to slide her painty feet around and we got some even better effects!


Our finished Earth looks even better in real life and is a very colourful addition to the lounge room wall :-)

We Play

“Come over to play at the
Childhood 101 We Play link up”


Sunday, April 17, 2011

Things We Love About Earth

Earth Day is coming up on the 22nd of April so today we talked about the things that we like about our planet. Bubble is very much into the solar system so this activity was just about the highlight of her day :-) I loved hearing the sometimes obscure but all very sweet things she came up with!

WE USED:

* play dough (green and blue)
* pop sticks
* permanent marker

First we rolled a big ball with our blue dough then Bubble went to town with the green dough to create her own version of Earth.


We wrote all the things she loves about Earth on our pop sticks, my favourites would have to be "pears and blueberries to eat" (neither of which she actually likes to eat) and "ponds with fish in them" :-)

We are going to leave our Earth on display for the rest of the month and add to it after each day. It's been a great way to talk about things we enjoy and also explore different elements of our planet.

Thursday, April 7, 2011

Easter Egg Roller Painting

Today we put an Easter twist on marble painting using our plastic eggs, both girls really enjoyed this activity and made quite a stack of artwork!

WE USED:

* tray
* paper
* large marbles or rocks
* plastic eggs
* paint

hint: we put newspaper and wet paper towel nearby to make it easy to remove the eggs between paper changes.

We used large marbles inside our eggs to weight them, but you could use anything really - a few smaller marbles, stones, sand etc...).

The marbles fit inside perfectly and made the eggs roll better through the paint.


Bubble rolling and tipping her tray to make Easter egg paint patterns.


Squeak loved this activity, we had trouble getting the tray off of her to change her paper before the piece she already had disintegrated into a soggy mess! :-D

We Play


“Come over to play at the Childhood 101 We Play link up”

Playdough Printing - Easter Sight Words

We played this fun game as a variant of our usual sight word activity this week, using Easter words instead.

WE USED:

* play dough
* speech cards
* marker/pen
* alphabet blocks
(if you don't have any alphabet blocks you could make some bottle lid stamps to use instead).

We brainstormed some Easter words and I wrote them on speech cards for Bubble to use as prompts.
Our alphabet blocks are upper case so I deliberately wrote her word cards in lower case so she could practice her upper/lower case letters at the same time.

Bubble rolled out a big sheet of play dough ready to stamp on.

She found each matching letter block to create her words and stamped them into the dough.

Some of the letters printed back to front of course, but the blocks were used to spell out our words as we went.


Bubble loved this activity and spent quite awhile working her way through each word card.


Playdough Eggs

When is an egg not an egg? When it's made of play dough!
This was an extension of our 'learning about eggs' activities and Bubble in particular really enjoyed it. I wanted a more interactive way of teaching the girls the parts of an egg without wasting a real one, and this project worked well.

WE USED:

* plastic eggs
* play dough (white and yellow)
* small laminated picture of a chick, or small plastic toy.
* child safe knife

To make our play dough eggs I took some white dough and made a well in the centre, then rolled some yellow dough to make a 'yolk' to go inside.

Then folded it over and gently rolled the whole thing into an egg shape. The play dough then went into a plastic egg.

I made quite a few for the girls to explore, all with yolks in the middle except for one with a chick inside. Before we cut open our play dough eggs we talked about how chicks develop and hatch.

Bubble loved cracking open her eggs,

and cutting them each in half to reveal the yellow yolk inside.


She was especially delighted to find the chick hidden inside one of the eggs!