Wednesday, August 31, 2011

Crayon Scratch Pictures

We took this activity to the park with us today while we enjoyed the increasingly warm weather (yay for sunshine, we've missed you!). The girls enjoyed crayon scratching but not as much as I thought they would, Squeak (2) was initially interested but after a little scribble wandered off to follow some ducks. Bubble (4) was into it for longer but still only wanted to do one picture.
We will be doing this again for sure, but next time we will try colouring the back ground with the other crayons before going over the top with black and seeing how that works out. We'll also be doing it at home without the distractions of waddling birds and climbing frames!

WE USED:

* coloured paper
(you can use white as well though)
* black crayon
(the softer crayons work the best)
* wooden skewers
(you could use anything from sticks to forks for the scratching part, we just used skewers because they were on hand)


Cover your sheet of paper with a layer of black crayon making it as dark as you can. The lighter coloured paper will show through better but any type (except black) should work.

Use your scratching utensil (in our case skewers) to make pictures and patterns. The coloured background will show through as the crayon is scraped away.


Tuesday, August 30, 2011

Movable Art

Set up on one of the desks in our study at the moment we have a 'movable art' station. The girls have been enjoying it so much I think it may become permanent, it has been a great way to encourage their spontaneous creativity with minimal mess and wastage.
The idea behind the movable art is to put out jars or containers of all sorts of things - beads, buttons, feathers, ribbons, matchsticks - anything at all your children can use to create pictures and/or words. Also provide a stack of different backgrounds for them to use, which can be anything from coloured paper to fabric swatches or foam sheets. The more textures and colours the better!
Once the pictures are finished we take a photo of their artwork and then all of the materials can be moved to create new art or packed away for the next burst of creativity.
The materials can be used over and over again (and changed often to keep them interesting), there's no build up of paper artwork and we get to enjoy their creativity by way of mini albums made from the printed photos or the digital photo frame.
The best part though is that the lack of need for glue or paint means the girls can do this anytime and we can safely leave it all set up without fear of destroyed walls, carpets or worse.

The girls creating movable art using brown paper bags, paperclips and buttons.


Once the masterpiece is finished we take a photo and we're ready to start again

Play Grow Learn

I don't often promote things on this Blog, but anything cooked up by the brilliant Christie at Childhood 101 has to be wonderful. We were lucky enough to be a small part of their latest project Play Grow Learn.
This amazing magazine contains 62 pages of brilliant play ideas for children from birth to 5 years and can be downloaded for only $4 US.
I couldn't believe my eyes when I checked it out today, the layouts and photos are just stunning, with so many ideas jammed into one issue it is a great read.
Head over to Childhood 101 for a look and download their very first issue.


Saturday, August 27, 2011

Repurposed Cot

Recently our little Squeak made the transition from the cot to her first big girl bed. I dutifully moved the cot into our study waiting to be dismantled and either stored or passed on, but kept finding reasons not to do it.
The thing is, I'm certain there will be no more babies for us. Kind of certain. OK, 99.99% certain. But every time I passed the study and saw our empty cot looking back at me forlornly (it really was) I'd procrastinate a little bit more.
So in the end I decided not to take it apart at all... and turn it into a desk. As you do.
It has turned out great and was extremely easy to do without modifying the cot and rendering it unusable once I get the courage to pass it on. Or use it again. Whatever.

WE USED:

* baby cot with a removable drop side
* mdf/particle board cut to mattress size
* blackboard paint

Our drop side had already been removed so all I had to do was adjust the base to the highest newborn setting.

I cut two sheets of thick mdf to fit snugly into the mattress base to provide a table top. I deliberately chose thick strong board to strengthen the desk should any small people climb, sit or stand on it (inevitable in this house).
The boards were painted with blackboard paint to create a chalkboard table top.

It was then easy to use hooks and suction hooks to create storage on the cot sides. I'd love to attach some small shelves for colouring books too.

The paper storage box is made from an empty muesli box, I cut the front to make the paper accessible then primed and painted it before super gluing it to a thick piece of card for extra strength.

On the left hand side we hung Bubble's whiteboard for doing her therapy homework using 3M removable hooks. The white shelves are a spice rack bought from the local Salvo shop for $5 and repainted, this is where we will store our small craft items like glue pots and beads.

The girls have been having a blast with it already :-)


Wednesday, August 24, 2011

Skewer Snacks

My girls have rather short attention spans and bore easily when it comes to your run of the mill eating utensils. Spoons and forks? Are you kidding? Snorefest.
To keep things interesting and work their fine motor development and co-ordination I often trade their cutlery in for something different;
A set of small tongs.
A pair of chopsticks.
A mini soup ladle.
It's all a bit of fun and also great for hand strength and developing skills such as their pincer grip.
The biggest hit lately has been skewers - the wooden/bamboo type that you get in big packets. I buy the mini sized ones and they are perfect for snacks like berries or fruit (I usually freeze them and then serve them semi thawed), cheese, pieces of bagel or cake; anything soft enough to skewer basically.

WE USED:

* mini bamboo skewers
* soft snack foods
(in this case semi thawed blueberries)

Both girls love the challenge of 'catching' their food.


Please note: I have found that Squeak (2.5) can wield a skewer quite safely, but please use your own discretion about whether or not your child can eat with a sharp utensil and only use them when you can supervise. You may want to blunt the end of the skewer by cutting it with clean scissors or by pressing the tip into a cutting board to flatten it.

Monday, August 22, 2011

Painted Strawberry Pots

Now that we have a backyard the girls have been busy planting herbs and vegetables in pots and learning about how food grows. On a recent visit to our local nursery they honed in on the strawberry plants and "really had to have some", so they chose a plant each and we spent the last few days painting some special pots for them.

WE USED:

* strawberry plants
* soil
* unsealed terracotta pots
(if you can find some shaped like strawberries, even better!)
* acrylic paint (red and black)
* paint brushes
(we used a large and small brush)
* drop sheet or newspaper
* clear sealant/varnish
* face washer (for clean up)


We upended our pots on the drop sheet and the girls used the wider brushes to paint them all over with red acrylic. Then using the smaller brushes they covered their pots with spots using the black acrylic.

We left them to dry and then I painted them with a clear varnish. We then left them to dry thoroughly until the following day.

The girls used their sandpit shovels and a small bag of potting soil to plant their strawberries. We had a good look at their root systems and all the different things we found in the soil.


Our strawberry strawberry pots - very cute (and hopefully in a few months time also delicious) :-)


Saturday, August 20, 2011

Laundry Day Sock Sorting

This game is very simple and is one Squeak and I play every time I bring in a load of dry washing. It's a great way of keeping her occupied while I put the clothes away, teaches her the concept of same and different and develops her colour and matching skills. She also loves helping and having a job to do!

Other simple laundry 'games':

* folding items such as tea towels, face washers and pillowcases.
* helping to sort each family members clothes into separate baskets or piles.
* helping to put folded items away.
* handing you each item from the basket and labelling it's colour or what it is used for.
* counting how many of each item there are (how many jumpers? How many socks?)

WE USED:

* loose socks from the laundry basket

Spread one of each sock out on the floor making a stack with the matching socks. We always use a small rug in Bubble's room for this activity to give Squeak a visual boundary.

Your child can then find the pairs by taking socks from the stack and matching them with the ones on the floor.

We usually chat as she plays so we can practice descriptive language such as colours, patterns, characters and who each pair belongs to.

Wednesday, August 17, 2011

Reflective Collages

Mr Bubble & Squeak is a guy who really likes his snacks, and most of those (pretzels, muesli bars, crackers) come in foil packaging. Since I'm quite partial to shiny things I've been cleaning all the packaging and stashing it in the craft box to use for 'something' and this week we put it to good use.
I'm going to do some more structured activities with the foil later on but this time around the girls just had fun practicing their cutting skills snipping it into little pieces and making reflective collages. This activity had a lot of great sensory elements to it, Squeak in particular loved the crinkly noise some of the foil packets made while she was gluing them to her paper.

WE USED:

* cleaned foil packaging
* scissors
* child friendly glue
* paper or cardboard


Wednesday, August 10, 2011

Fun Ideas for Play Dates

In amongst all of the unpacking, organising, settling in and finding new therapists/shopping centres/schools (the list goes on!) we haven't had as much time for craft activities as usual around here. To compensate what we have been doing a lot of is play dates! I thought I'd share a few of the activities my girls and their buddies always seem to enjoy when they get together:

An Indoor or Outdoor Picnic Lunch:


It doesn't need to be anything complicated, something as simple as a paper umbrella in a sandwich or some crackers and cheese tucked into a folded paper aeroplane can make lunchtime special. Spread a tablecloth or drop sheet out on the floor or grass and make it as fancy or simple as you like.
Have a tea party using real china, serve food in unusual ways such as in (thoroughly cleaned!) sandpit toys, jars or jelly moulds, use cookie cutters to make shapes from food items or thread everything onto skewers for something a bit different.
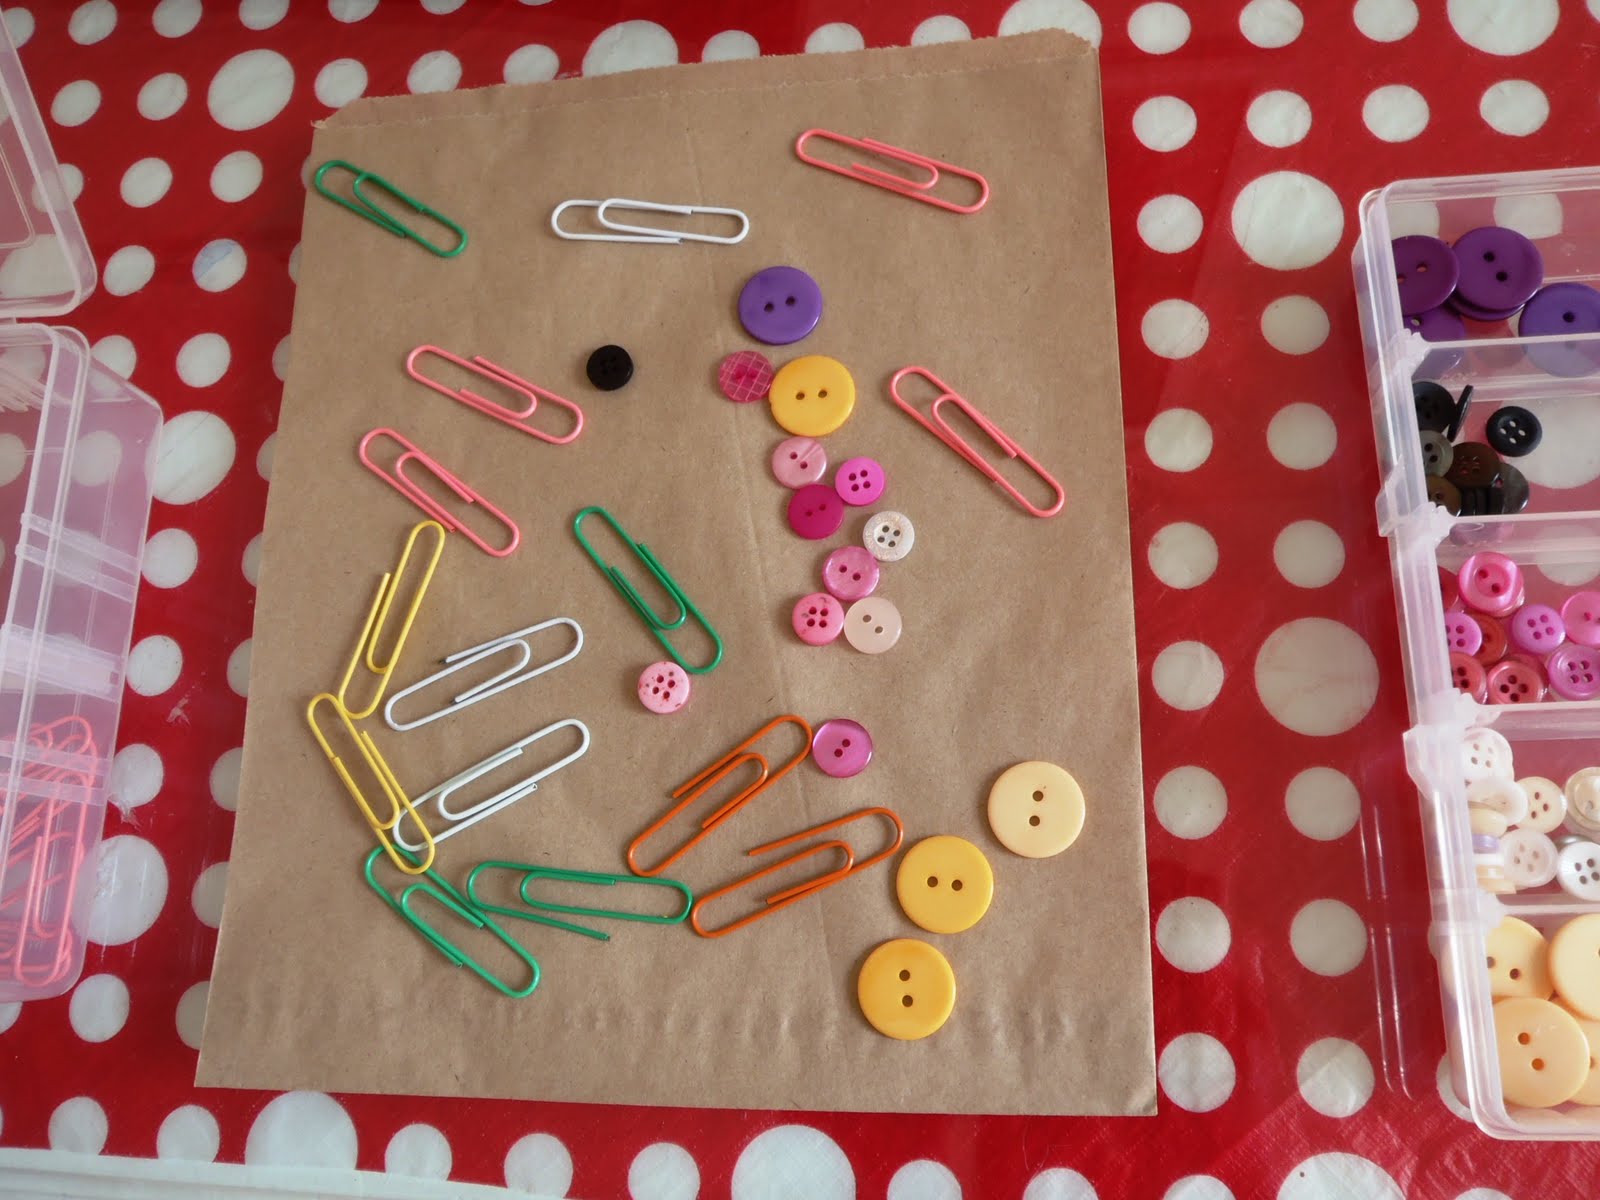

Clay Models:

Clay is a great medium for free and unstructured play. Put out containers full of anything you can find that could be used for decorating or pattern making. Not only is it lots of fun and something the visitors can take home, it's also fabulous for fine motor development. Salt dough is a great alternative if you can't find clay.
Things that go well with clay: googly eyes, forks and child safe cutters, play dough equipment and cookie cutters, scrapbooking embellishments, buttons, beads, feathers, natural elements like stones, seeds and nuts, split pins, non inked stamps, glitter and sequins, cord/ribbon/twine.


Jelly Making:

If your play date is a few hours long let the kids help to make some jelly at the start to enjoy for afternoon tea, or make some the night before. Layers of different colours are always fun or maybe try setting them in individual containers like ramekins or clear tumblers.


Mini Gardens:

Use cheap or recycled pots or raid the recycling bag for containers you can reuse to make mini gardens. A few punnets of herbs or easy care flowers like petunias and a small bag of potting mix will keep the kids busy and will be something nice for them to take home too. Make an activity of decorating the pots or plant fast growing seeds (such as cress) instead of seedlings.


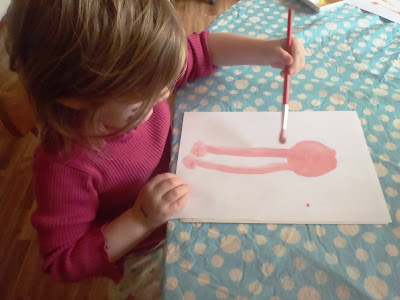
Painting With Water:

Easy, cheap and minimal/no clean up required makes this a play date activity we always include. All you need is a bucket or cup for each child, a paintbrush and some water. Let the kids paint concrete, stones, fences. Try experimenting with brushes of different sizes and types or make a giant painting using buckets and brooms if you have a large concrete area to use like a driveway.


Warm Water Play/Washing Up:

Another easy activity which is especially fun for water play on colder days. Fill tubs or buckets with warm soapy water and chuck in some things for the kids to wash and a few cloths. Maybe they could give the outside toys a good clean or wash the low windows on the outside of the house. Add in some rubber gloves, tea towels and small scrubbing brushes for added play value. This activity is also great to do after any kind of messy play or before mealtimes to get hands and faces clean.


Park Hopping:

Do an Internet search of your local area/council site and find some parks nearby. If you have a few you could create 'Park Hop Passports' and use stickers for each one you visit, or you could scavenge for natural items to make murals (leaves, bark, feathers, seeds) or take along sketchbooks and pencils to do nature drawings. Take along some binoculars or magnifying glasses if you have some and see if the kids can spot anything interesting.


Free Play With Cardboard Boxes:

We have a LOT of boxes lying around at the moment after our move, but you can also source them from places like supermarkets, garage sales and big department stores. Tape up a pile of boxes and let the kids loose with pencils, chalk, markers, rope, twine, glue, stickers, scissors - anything they can use to create with. Last week in our backyard we had a cave, a shopping centre, apartment complex, aeroplane and a few cars!


Baking Projects:

Simple baking recipes are a great way to keep the kids entertained and get them to help out with afternoon tea. We usually make our One Bowl Muffin Mix and the kids personalise them by mixing whatever they would like to add into their own bowls. Make it a two step process and enjoy decorating them as well after they have been baked.


Fabric Crayon Pillow Cases:

I bought a pack of fabric crayons a few years ago now and they were such a great purchase, we have used them many times and they are always a hit. A favourite play date activity is personalised pillowcases, I just buy them when they are on sale and put them away but you could also re purpose some from thrift stores or recycle ones you already own. Cloth napkins, tea towels and old t-shirts also work well and if you don't have any fabric crayons then permanent markers can work too.


Chalk and Concrete:


Another activity that is great for creative play and is always a winner. Let the kids draw to their hearts content and if you need to clean up afterwards all you'll need is a hose or bucket.
Use chalk to draw game boards like hopscotch, noughts and crosses or a giant version of snakes and ladders, or create roads and communities for doll and car play.


Painting Portraits:


Painting is always fun, but how about painting self portraits or portraits of each other. Create a 'gallery' on the washing line or clothes airer and see if the kids can pick who painted who.


Setting Up Tents:


Whether they are big full sized tents, small pop up tents, beach sunshades or a broom with a bed sheet thrown over it put them up and let the kids play activities inside them. If you have a few set them up in different areas of the yard or inside the house. Eat lunch in there, read books or play board games - it's all more fun inside a tent!


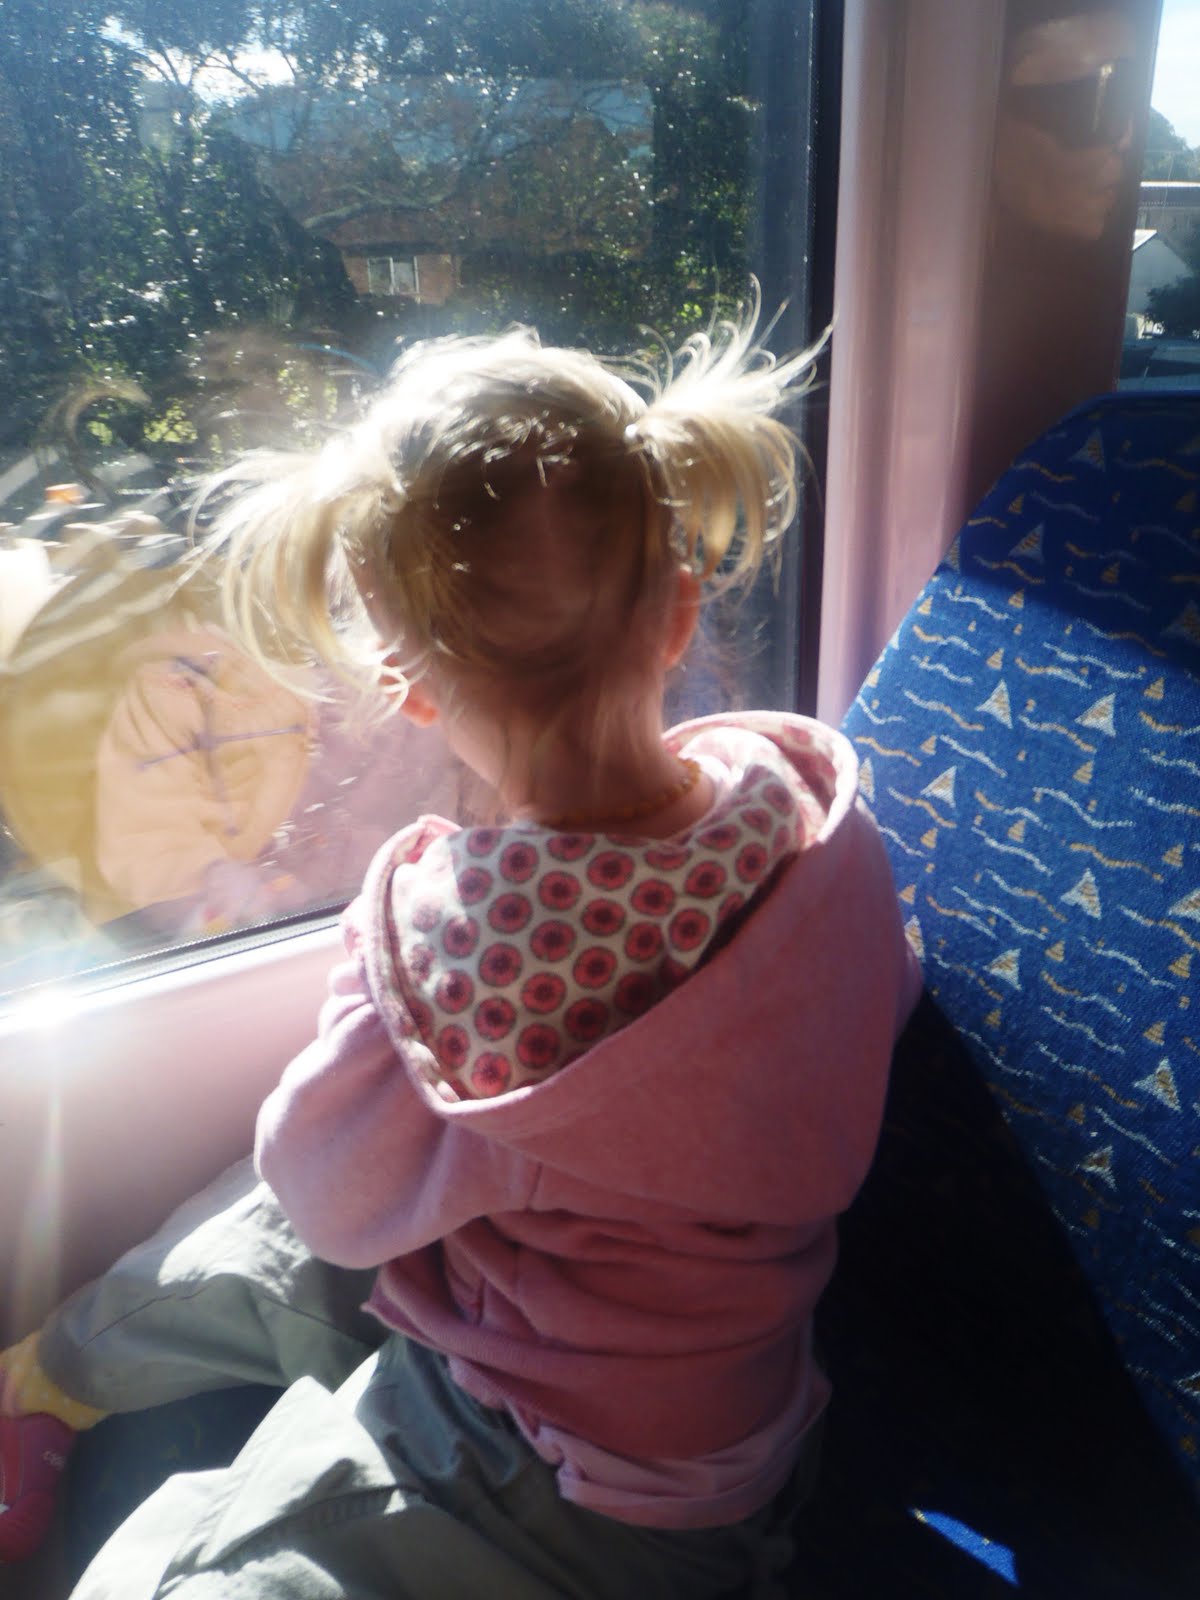
Riding On Public Transport:

If you have trains, ferries or buses nearby get a return ticket to somewhere close-ish and go exploring. Take snacks or a picnic, the camera, some notebooks to draw what you see or some games to play like Sight Bingo or Spot The Letter. Find some new parks or beaches, or don't even get off - just enjoy the scenery.