The girls have been 'needing' an oven for the play room for awhile, and it's been on my list of things to do. We scored a second hand wooden play sink from a closing down Kindy last year and have been searching for an oven to go with it ever since.
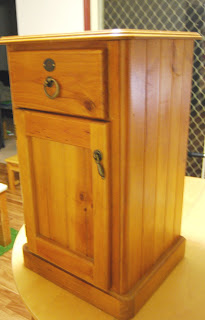
I have seen so many wonderful bedside table to play oven conversions on Pinterest and decided to give it a go this week. I'm not sure where this idea originally came from, but if anyone knows I would love to provide a link because I think it's brilliant.
It was relatively easy to do and I'll list where we got all of our little parts from for any Aussie readers who would like to give it a go! The oven has been massively popular with the girls so far and ended up costing a grand total of $17.50 to make, so we're all pretty happy with it.
WE USED:
* old bedside table with door
(we got ours very cheaply from Ebay)
* paint, primer and brushes
* round cork coasters
(ours were $1.50 for a pack of 4 from Hot Dollar)
* blackboard paint
* piano hinges
(around $3/pack of 2 from Bunnings)
* magnetic closure fittings
(we were able to reuse the ones that were originally attached)
* handle for oven
(we already had one but they are under $10 at Bunnings)
* replacement pot lid handles
(pictured below in case like me you had never heard of them! They were $1.50 for a pack of 2 from Hot Dollar)
(pictured below in case like me you had never heard of them! They were $1.50 for a pack of 2 from Hot Dollar)
* plywood/chipboard
* fabric
* drill and screws if not included with your hardware.
* glue adhesive
(we used Liquid Nails)
We bought our bedside table cheaply on Ebay, you want one with a cupboard style door that you can convert into an oven.
First I removed the drawer and door then primed the entire unit. I didn't bother sanding it first because I didn't mind any little imperfections in the wood. After the primer was dry I did three coats of Dulux 'Class Blue' grey paint, which we had leftover.
I searched for a long time to find something to use as oven dials. These pot lid handles were perfect; they look the part, actually turn and were super cheap at $1.50/2 pack.
Our door had external hinges so I removed those and used some piano hinges from Bunnings to reattach it from the bottom instead of the side, so it opened like an oven door.
The magnetic closure catch I just unscrewed and then reattached to the top instead of the side and moved the metal base plate on the door to match up so the door would hold closed.
I was going to build a shelf for the inside of the oven but then realised an unused IKEA shelf insert I had fit perfectly.
Before attaching the door I painted the middle part with blackboard paint and attached a cupboard handle on it's side to act as the oven door handle. The coasters I also painted with blackboard paint and then attached to the top with adhesive glue to act as the 'hotplates'.
Once the door had been reattached it was a bit higher and the drawer no longer fit, so I cut a thin panel of chipboard to fit the space, drilled some holes for the pot lid handles to be attached and covered it with fabric to pretty it up a little. It tacked easily to the front of the unit after I had screwed the 'dials' on.
Finally ready to be played with! Now all we need is a fridge :)
It has been getting a very good work out so far.


Oh wow! This is fabulous! :) I love it and the sink too! :) Job well done I say - looks like a wonderful place for imaginative play! :)
ReplyDeleteThat's fantasitc! we recently made a play kitchen and my kids spend so much fun time with it.
ReplyDeleteThat looks fantastic! Wow, you've put a lot of thought into the details and it's really turned out well.
ReplyDeleteyouve done a great job. we only just threw out (flood damaged) the one my Dad made for our kids that they have used for years. So much fun. Ours started off inside but them became more of an outdoor mudpie kitchen. Lots of fun
ReplyDeleteThis is brilliant! Love how you made the toy oven :-) I am planning to make one for my kids this year ~ thanks for the inspiration,pinning!
ReplyDeleteFantastic!! You are such a clever Mummy...thank you so much for sharing, i'd love to give this a try!!
ReplyDeleteI LOVE LOVE LOVE this!
ReplyDeleteSuch a great message for our children. Re-purposing, recycling, upcycling. All of that. And patience too! Also perfect that the whole family were involved.
I'm sharing this post. Just wonderful.
Hasn't it turned out wonderfully :)
so so so good :)
ReplyDelete