Saturday, December 29, 2012

Simple Fairy Playmat

One thing the girls asked for on their Santa lists this year were Tinkerbell Fairies. They are both fascinated by fairies and 'magical' things at the moment so we spent some time after lunch today making a fairy land for some imaginary play.
This mat was really quick and easy to make, you can use just about anything you have lying around the house and it doesn't matter if it isn't perfect. It's all about prompting creative play, so keep everything simple and movable.

WE USED:

* small turf mat
(we ask for cut offs cheap from our local turf shop. You could use anything though; felt sheets, towels, coloured paper, fabric cut offs, the top of a table)
* felt sheets
* scissors
* corks
* pop sticks
* pompoms
* small stones

You can literally use anything you have on hand. Ribbons could be rainbows or rivers, bottle lids could be boats or stepping stones, make a lake using foil or use things from the garden like leaves, gum nuts and sticks.

We used a small piece of turf off cut as the base of our fairy land but you can use anything you have on hand. I cut the felt pieces and the girls added their own elements like stones, glittery pompom flowers and fairy houses made from paper.

The girls wanted toadstools for their fairies to dance around so we made some using corks and felt. None of the pieces are attached, they can be moved easily to become other things when they aren't being toadstools.


We made a lake out of blue felt and Bubble made a bridge using pop sticks and stones. The sticks kept sliding off so we added some blutac (sticky tack) later on to hold them in place.

We made a few different types of rainbows using felt offcuts.

The girls liked the solid arch rainbow the best because they could use the arches separately as other things (a sunset, a cave, a magic mountain).


Saturday, December 1, 2012

Christmas Count Down - Whiteboard Bunting

It was the first of December here yesterday and we were busy putting up our tree and house decorations while listening to Christmas songs. Cheesy, I know, but still my favourite time of the year!
One of the first things to go up were our count down calendars, this year we are using our reusable felt tree calendar that we made a few years ago but I thought something a bit more interactive would be fun too.
This whiteboard bunting was very easy to use and both girls can practice their number writing over and over again. Best of all it can be packed away and used again next year!

WE USED:

* paper
* printer
* laminator and pouches
* scissors
* blutac 
(or string and tape)
* whiteboard marker

Other ideas:
Both Bubble and Squeak are good counters but if this is something your child is still learning you could add stickers to make this count down even more fun. Each day they could add the right number of stickers by counting them out and sticking them on themselves.

To make the count down bunting I made some designs on the computer and printed them out before laminating each sheet. Then they were cut out ready to be hung on the wall.
The templates to make the bunting are at the bottom of this post.

We hung up our flags using blutac (sticky tack) so we could easily take one down a day to do our tracing and then put it back up again.
If you don't want to use blutac you could easily tape the flags along a length of string instead and use removable hooks at each end.

Each bunting flag has a traceable count down number on it.

Bubble tracing our number one flag yesterday.
Because the flags are laminated and we are using whiteboard markers the girls can practice over and over again before we hang the flag back up.

 Two days into our Christmas Count Down!


BUNTING FLAG TEMPLATES
(right click to open to full size and print)


Sunday, November 25, 2012

Mortar & Pestle Ice Play

When she was younger, Bubble was obsessed with ice cubes. Obsessed to the point where we had to put a padlock on our freezer door after finding it left open repeatedly from late night ice tray raids. We have managed to curb the obsession but her fascination is still there so ice play activities feature highly in our house.
One of the things she enjoys most is breaking ice into 'bits' so I thought she might enjoy trying out the mortar and pestle. Not only did the girls enjoy the process but it was a great motor exercise.
I knew Bubble would want to eat/lick the ice so I didn't add anything to it but this activity would be a great way to retrieve objects frozen inside (click HERE for our Ice Egg post).

WE USED:
* ice 
(we used small containers to freeze our water in)
* mortar & pestle
* small bowls
* absorbent towel/drop sheet

I chose some small containers from the recycling box that were roughly the same size as the mortar bowl to freeze our water in overnight.

The girls extracted the ice themselves and started experimenting with the pestle.

Their approaches were very different, Bubble pounded her ice and broke it into tiny pieces while Squeak was more cautious and kept turning her ice block over to bang on both sides.

As little pieces were chipped off the girls took them out of the mortar and placed them into bowls. They examined the ice bits with their magnifying glasses, laid them out on the towel to watch them melt and (of course!) ate some :)


Friday, November 23, 2012

Fort Drawing

One thing you are almost certain to find at our house is a fort. 
We permanently keep a pop up basket in the lounge room with an old sheet and clamp pegs and the girls use them to make little tents, caves and castles in any room of the house.
Today they had set up a tent in Bubble's room using some chairs and the side of her bed so they could crawl all the way underneath. The old sheet they use was once a painting drop sheet so it has quite a few colourful patches on it. Today we made it a bit more colourful using textas and imagination :) 
The girls had a ball doing this project and I really enjoyed hearing their decorating plans evolve. They decided it would be a 'Fairy Tent' and we ended up with everything from leaves and rainbows, to waterfalls and flying fairies.

WE USED:

* old sheet
* washable textas/markers

The girls tent set up in Bubble's room. I love the way they used the side of the bed so they could incorporate the underneath area into their play space.

Lots of markers. You could use any kind, we used washable so we could create other scenes at a later date.

Squeak hard at work creating a garden.

One of Squeak's fairies :)


Bubble drawing a big waterfall and some water fairies.
The girls made up a story as they drew all about what their fairies were doing and where they were going in the Fairy Tent. 

Off to explore.

Friday, November 2, 2012

Spaghetti Catch - Ribbons and Chopsticks

This fine motor game was actually Bubble's invention, I love it when the girls create their own fun activities, it gives me warm fuzzies.
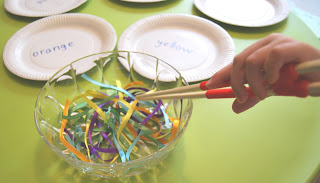
I walked into our craft area yesterday to find her with a pile of cut up ribbons using a pair of chopsticks to transfer them into different bowls. When I asked her what she was doing she told me it was her new game called 'Spaghetti Catch'.
We added a bit more learning today using paper plates and the girls have been playing away all afternoon.

WE USED:

* coloured ribbons
* scissors
* paper plates
* marker/texta/pen
* chopsticks (or tongs)
* foam beads 

 
Bubble had cut up several different coloured lengths of ribbon into smaller pieces, so we put them all into a bowl together to make the 'spaghetti'.

We then put out paper plates to make a colour sorting game, but instead of putting actual colours on them we made it a bit trickier for Bubble by writing the words instead so she had to read them.

The girls then used their chopsticks to pick up the ribbons and put them onto their plates.


Little Squeak found picking up the ribbons too difficult and told me "it's too tricky for me Mama".
We added some small foam beads from the threading box as 'meatballs' for our spaghetti which were still a challenge for her but after some practice she got the hang of it.

 
They played this game a few times over and then it graduated into restaurant imaginary play which kept them happy for hours!


Wednesday, October 31, 2012

Pin The Spider On The Web

This was a fun little Halloween game to play with the girls that snuck in a little bit of learning as well. I think it will be staying on the wall long after today is over though because they are both enjoying it a lot!

WE USED:

* black streamers
* blutac (or 'sticky tack')
* spider pictures
(we just used Google images)
* blindfold

Using streamers and blutac we created a spider web on the wall.
The idea of this game is essentially the same as 'Pin The Tail On The Donkey' but using a web and spiders instead.

Instead of a generic spider shape I decided to use pictures of common Australian spiders that the girls see often.
I put the spiders names on the reverse side of the picture before laminating them so that we could learn those as well.
 
We looked at each spider and talked about where we thought it got it's name, how venomous it was (or wasn't), where it liked to live and if we had seen them before.

The girls loved being blind folded and spun around before attaching their spider to the web.

We were trying to see who could get closest to the center of the web.

They both did very well!

Sunday, October 28, 2012

Colour Mixing - Paper Plate Pumpkins

The girls added to our Halloween decorations today by making some paper plate pumpkins. Not only was it a lot of fun but they got to do some colour mixing and fine motor play as well. I think we will have to do a Christmas version of this activity, it was very popular!

WE USED:

* paper plates
* red and yellow paint
* brushes
* face shapes cut from a template
(available at the bottom of this post)

I made up some simple 'face shapes' for our jack-o-lantern plates and then printed out a sheet for each of the girls (our shape sheet is at the bottom of this post if you would like to use it too).

Before they started painting we had some fun arranging the pieces to decide where they would go.

The girls loved squeezing the paint onto their plates. 
At first they both added too much red compared to yellow and had to slowly add more yellow to get orange, it was great to watch them working it all out and seeing the different shades we ended up with on each pumpkin.

Bubble mixing her paint to get just the right shade of orange.


While the paint was still wet they added the faces to make their jack-o-lanterns.

We ended up with a whole pumpkin patch on the wall.

I love how they turned out and will be keeping them for next year!

Right click and open in a separate tab (at full size) and then print.