Wednesday, September 28, 2011

Wobble & Shake Balloons

This was really really fun and really really simple, definitely something we will be doing again.
These balloons remind me of a toy my brothers and I had when we were younger, it was a rubber medium sized ball quarter filled with water that went in crazy directions when you threw or kicked it.
We had a similar result today but with the added fun of a rattly noise.

WE USED:

* balloons
(we used thick helium quality ones but any kind will work)

* funnel

* filler for balloons
(we used dry rice. Dry beans, birdseed, gravel etc... would work as well. You could even use water or flour if you didn't want the balloons to be noisy).

We placed our funnel in the top of the balloons and used rice from our sensory table to fill it up. We varied the amounts we put in to see what the different effects would be.

Once we had enough rice inside I removed the funnel, carefully blew up the balloons and tied them off.

They were so much fun to kick and throw around and the girls loved the rattly sound they made.
There is of course always the possibility of these balloons bursting so if you are worried about mess maybe make this an outside game!


Baked Doughnuts

Please excuse any typos, but I have a doughnut in each hand.
I came across this recipe on the fabulous Frills In The Hills blog a while ago and it's been on my 'to do' list ever since.
Well, on my 'try to do' list anyway, I'm not exactly a Master Chef (or even a Junior Master Chef) but these were seriously easy - the perfect kind of recipe to make with the kids.
The end result is so delicious, definitely better eaten warm but still nice the next day too.


Monday, September 26, 2011

FaceBook Page

A Little Learning For Two now has a page on FaceBook :-)
I hope you'll come over and join us, I'd love to see the wonderful activities you've been doing with your little ones and share some older activities from our archives.
I will add a link button to the sidebar soon, but until then I'm hoping this link will work:

A Little Learning For Two

Things That Fly

This game was a fun way of teaching the girls about 'things that fly' as well as working on some fine motor skills. We did it outside where there was a slight breeze this morning, so our balloons went an extra long way!

WE USED:

* balloons
* pictures of things that fly
(we just drew some on paper but stickers would work great too)
* sticky tape

The girls and I made a list of 'things that fly' and I traced some pictures to use for our game. Stickers would work just as well or better if you have them!
We cut out each one and attached a small piece of tape, then the girls took turns choosing a picture for their balloon.

We blew up our balloons and held them closed without tying them off. We found the side of the balloon was the best place to put the pictures so we still got a lot of height when we let the balloon go.


Sunday, September 25, 2011

Tub Numbers

Ever since we moved home we've been trying to help the girls memorise our new phone number. We practice it wherever and whenever we get the chance and today we turned it into a bath game using some left over foam sheets.

WE USED:

* foam sheets
* scissors
* water
* tiled surface (bath/shower)

Inspiration for this activity from this post by The Imagination Tree.

It only took a few minutes to cut the numbers from our foam sheets (might take a little longer if you want them to look a bit less wonky than mine haha!) and the girls enjoyed scooping them out of the bath and sticking them in order on the tiled wall.
I alternated between the two colours of foam sheet we had for each of the numbers to try and aid visual memory.

Monday, September 19, 2011

Painting With Recyclables

We have two recycling bins at our house; one that goes out for collection once a week and another that we fill with things we want to reuse at home.
Painting with recyclables is one of our go to activities, especially when the weather is nice and sunny like it was today and we can paint outside. We use all sorts of things to hold our paints, paint on and paint with. Once we are finished it is either rinsed out to be reused again, displayed or recycled.

WE USED:

* recyclables
(empty cereal boxes, cardboard tubes and rice cracker tray)
* paint
* brushes
* tub of water

Today we painted on empty cereal boxes which I cut open on one side so they would fold out. An empty rice cracker tray is perfect for holding the paint.


We always put out a tub of water for washing the brushes rather than a cup or something smaller since there is invariably hands and feet to wash at some stage!


One of the girls favourite activities is painting different surfaces in the backyard to make prints. The surface they used today was grass, the paint effect came out really pretty.


I knew hands would be involved eventually! :-D


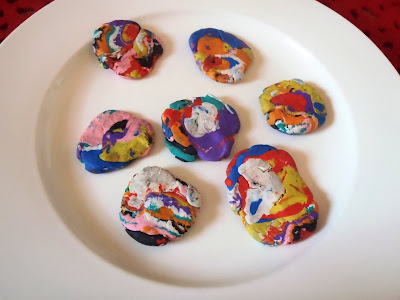
Plasticine Cookies

Bubble has abandoned play dough for plasticine lately and today she was keen to make 'rainbow cookies'. Both the plasticine play and the decorating with beads and embellishments are great for fine motor development.

WE USED:

* plasticine
* beads and various small craft embellishments

Bubble rolled and flattened her plasticine into 'cookies'.

Then we raided the bead and embellishment box to decorate them.


Sunday, September 18, 2011

Ice Eggs

This activity was a blast!
When I saw the forecast last night for warm weather today I got busy filling our freezer with 'ice eggs' for the girls to play with (ok, and me too :-D).
This activity is a combination of the Ice Bowling and Alphabet Ice blocks we played last year which were both a huge hit.

WE USED:

* balloons
(round shaped probably work best)
* small toys/glass stones
* water (tap)
* freezer

optional : spoons, magnifying glasses, food colouring/tempura paint.

Sorry that there are no photos of me making the Ice Eggs, it required both hands and was done in the middle of the night when all sensible family members were asleep ;-)
It was a bit tricky the first few times but once you get the hang of it it's a breeze.
First I lined my small objects up along the edge of the bench top (I used horse figurines from our play farm and small glass stones), then using both hands I opened up the top of each balloon by working my fingers down into the narrow neck bit. Once I had it open I just slipped the small objects inside by sliding them off the bench while still holding the balloon. Then I could fill the balloon up with water using the tap, tie it off like a water balloon and stick it in the freezer overnight.
You could also add food colouring like we did for the Ice Bowling activity but my girls weren't keen on that last time so I just used plain water.

An Ice Egg with a figurine frozen inside.

We found the balloons literally popped straight off our eggs as soon as we picked them up, but you could use scissors to cut the balloon away if it's being stubborn.

The photos don't do these eggs any justice, they looked so beautiful. The girls were enthralled; rolling them around, smoothing them with their hands and holding them up to the sky to see the objects inside.


Cracking the eggs open to retrieve the 'treasure' was a lot of fun.

The girls used spoons to crack the hard ice on the outside and dig through the softer ice in the centre.


We got out our magnifying glasses and studied the ice patterns and objects embedded inside.

So much fun, we already have the freezer loaded with more Ice Eggs for the next hot sunny day!

Classified: Mom

It's Playtime at hands on : as we grow


Thursday, September 15, 2011

Building Block Maze

Sorry things are a bit quiet on the Blog front lately, we have had endless appointments finding Bubble new therapists and services so there has not been as much crafting going on here as usual!
This was a fun game we played today, we already had the pompoms out from another game we'd been playing, but ping pong balls, rolled balls of aluminium foil or any light plastic hollow core balls will work.
This was a great skill building activity working many areas of fine motor development.

WE USED:

* building blocks
* wide short straws
* large pompoms
(or other light ball such as ping pong balls)

Using our wooden blocks we made a simple maze/racetrack shape. For older children you could make it more fun by creating dead ends (to add problem solving) or a large spiral if you have enough blocks!

We added in some archways to make it a bit trickier. You could also use empty toilet roll tubes as tunnels or cut holes through things like milk bottles to use as obstacles.

The girls had fun taking turns to blow their pompom around the maze using their straws. We used our kitchen timer to see if we could beat our 'best score' each time without knocking over any blocks.


It's Playtime at hands on : as we grow

Classified: Mom