Friday, August 30, 2013

I Spy Book Costume

 Recently Bubble had Book Week at school and needed a costume for the Book Fair Parade. I asked her which book she would like to be and she answered me right away with her all time favourite series;
"I want to be an I Spy book!"
I Spy books don't really have any characters, just a bunch of random objects on each page and a list of things to find. The costume ended up being very easy to make and Bubble loved it so much she wants to wear it again for Halloween - double score!

WE USED:
* plain white t-shirt
(I bought ours at KMart for $2)
* random small objects
(we went through all of our drawers and toy boxes for small parts we didn't need any more, it was a great recycling project)
* hot glue gun 
* laundry marker
(we used Sharpie brand)
* old chopping board, thick card or something you can use as a barrier between the shirt layers. It must be something that can withstand the hot glue.

 First, I ironed our plain t-shirt and then slid an old glass chopping board inside it, between the front and back of the shirt. This was to stop the glue seeping through and joining them together!

It took me about ten minutes to attach the objects we had collected to the front of the shirt using the hot glue gun.
I would advise doing this activity in a well ventilated area as some objects were a bit stinky when the hot glue was applied.
Some of our objects got stuck to the glass chopping board through the t-shirt but they were very easily removed using a spatula and stayed attached to the shirt.

Using a laundry marker I wrote out a list of things for people to search for on the front of the shirt. This was a big hit, Bubble's friends really enjoyed finding all of the items.

To finish off her costume we found a detectives hat in the dress up section of a dollar shop and used foam stickers to write 'I Spy' across the front. I also hot glued a mini magnifying glass to the front which was a left over party favour.
Bubble carried her full sized magnifying glass for the parade and wore some pretend glasses because she wanted to look 'scientific' :)
The outfit came together really well and all of the objects stayed put for the whole day. I did put another shirt on underneath her I Spy one though so she could take it off during class, all of those little bits and pieces would have been a bit distracting!

Thursday, August 29, 2013

Father's Day Gift Idea - Interview Cushion Cover


 I have been wracking my brain for a few weeks now trying to think of a gift idea for my Dad for Father's Day.
Unfortunately we live in another state to 'Poppy' so it had to be something that could be sent easily by mail. I also wanted it to be something personal from the girls, as well as something he could use.
Obviously he will love anything our girls make for him, but I wanted something he could use day to day rather than something that would end up in a drawer or cupboard.
I have seen a lot of ideas for 'interviews' on Pinterest and loved the idea, this free printable from A Little Delightful was one of my favourites and the inspiration for some of our questions:
A Little Delightful : Father's Day Printables
Instead of putting our interview on paper though I thought I would put it on something that could be kept around the house and used. 
A cushion was the perfect solution!

WE USED:

* fabric cushion cover
* laundry marker
(we used Sharpie brand)
* scrap paper or cardboard

We started with a cushion cover which was blank on one side. 
I chose this one (from BigW) because the colours will suit Poppy's home and I love the symbolism of the saying on the front.

I removed the cushion insert and inserted some scrap cardboard so the ink from the Sharpie wouldn't stain through to the other side.
Then I just used a laundry marker to write out our questions and add in the girls answers.

Their replies were hilarious and I know Poppy will love reading them. My favourite replies would have to be "He loves to wear: a moustache!" and "The best thing about Poppy is : he laughs and delivers packages to us". 
I think he will also be particularly pleased at the guesses regarding his age :)

This activity was fun and easy to make and hopefully will be something Poppy can display in his house and smile at on a daily basis!

Thursday, August 8, 2013

Fake Snow Cones - Sensory and Fine Motor Play

For their birthdays recently Bubble and Squeak received some instant snow from their Aunty and Uncle (our rellies know fun when they see it :D). 
This week we used some to create a make believe snow cone stall which the girls had a blast with. Not only was it a great game for encouraging imaginative play but also provided plenty of sensory and fine motor experience as well.

WE USED:
* instant snow
* water
* small tub
* ice cream scoops
* squirt bottle and basters/droppers
* small cups/cones
* small containers of water and food colouring
* pop sticks
* play money

Side note - instant snow is heaps of fun to play with and non toxic, but it is not designed to be eaten. This activity was well supervised.

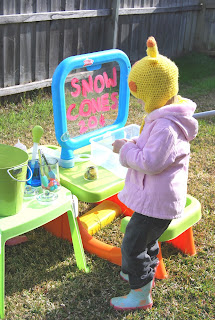
We set up a few tables in the backyard to create our pretend snow cone shop.

This is the instant snow we used, there are many different versions available though. The 'snow' starts as a powder that becomes a light fluffy substance once water is added.
Instant snow is bio degradable and we usually spread it on our lawn after use.

We made all this snow with just a few tablespoons of powder, then we put it in a tub with an ice cream scoop ready to create snow cones!

I set out a small tub full of different cups and paper cones for the girls to use.

Also on the table were some things to decorate the snow cones with; coloured water as syrup and pompoms as toppings.
I put the coloured water in a squeeze bottle and also in a jar with a baster to give the girls two different fine motor exercises. The pompoms were put in a jar with mini tongs to add more fine motor work.

We finished our little shop with some pop sticks and pretend money.

Open for business. The girls took turns being the shop keeper and the customer. We slowly built on their interactions and story lines, this sort of play is great for practicing living skills.

Bubble scooping out some instant snow to make a snow cone.

Using the squeeze bottle to make a raspberry snow cone.

The instant snow looked just like ice!

Squeak's turn to be shop keeper.

Using the baster to add her colour, the squeeze action involved is great for strengthening her hand muscles and grip.


Blueberry snow cone anyone?


Adding some pompom toppings.


Paying with play money. Bubble was getting very precise with her coins and terribly upset when her little sister kept giving her the 'incorrect change' :)

Once the girls had finished with a snow cone they dumped them into a bucket in our paddling pool. At the end of the game they had more fun squishing around the pool in the multi coloured snow.

Wednesday, August 7, 2013

Imprint Barrier Game

This game is an adaptation of the barrier memory games I used to play with my friends when I was little except instead of taking an object away you make an imprint with one object and the other player has to guess what it was.
This game was not only fun for my girls but exercised a lot of skills like concentration, object and shape recognition, fine motor development/hand strengthening and basic matching.

WE USED:

* a tray
* lots of small objects
(you could use more or less depending on your childs interest and ability)
* clay/play dough/sticky tack/theraputty
(anything that you can make an imprint in basically)
* a board or sheet of card to use as a barrier

I put a few different things that I thought would make distinctive prints in our tray and put it on the table with some sticky tack.

I held up the barrier and the girls took turns being the one to make the print and being the one to guess.
We used some thin plywood sheets we had in the garage as a barrier, you could use anything that blocks the other players view though (even a blindfold rather than a barrier.)

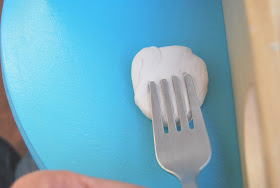
Squeak chose the fork on her first turn and made an imprint in the sticky tack by laying the tines flat.

When the barrier was lifted Bubble examined the print closely, turning it over in her hands and counting the lines that had been left behind. She worked out pretty quickly what had made the imprint!

In between each turn the girls squeezed and manipulated the tack to make it smooth again. This would be a great game to play with theraputty!
The girls did this activity for a long time, finding different ways to print the same objects and thinking up clues for each other when it was a tricky one to guess.

Tuesday, August 6, 2013

DIY : How To Make A Slant Board


Our little Squeak is not a fan of writing. Or drawing. Or doing anything with a pen on paper for longer than a minute, maybe two.
She has low muscle tone and painful joints, but there can be many reasons why children shy away from pen work.
Her wonderful OT recently suggested we try a slant board to take some pressure off her joints and create a more ergonomic position for writing. 
We gave the therapist's board a try and Squeak's concentration and perseverance skyrocketed, so I thought I'd have a go at making her one to use at home and also for the classroom next year.

What is a slant board?

A slant board is quite simply a board that has been set at an angle, usually with clips attached at the top to hold paper and exercise books.
There are plenty of benefits to using a slant board, some of which  include:
* improved wrist flexion/hand positioning and support which usually leads to better pen grip.
* the slant of the board brings the paper closer to the child and makes it easier to see. This is especially beneficial for children with visual problems.
* assists in the action of applying correct force when writing and drawing. Children with low tone like Squeak find applying downward pressure especially difficult and tiring.
* improved eye tracking, especially when reading. The board puts the work surface at a better level for tracking which reduces strain.
* enables better posture while the child works. This can have all sorts of benefits such as better concentration and in Squeak's case, less strain on her muscles and joints.
 
To make our slant board 
WE USED:
* a sheet of thick corflute board
(ours was 5mm thick and 1200mmx900mm in dimension, which was enough to make two slant boards).
* cutting/utility knife
* adhesive velcro
* ruler
* whiteboard marker
* hot glue/strong glue
* large clip


I started out with one large sheet of corflute board. It was 5mm thick and 1200/900mm in dimension, which ended up being enough for me to make two slant boards.

First I cut the board straight down the middle.

To do this I first measured the mid point then used a ruler and whiteboard marker to draw a line. Then using a sharp craft knife I carefully cut through one side, then bent the board in half and sliced the knife through the other side so the two halves were separated.

I then stuck a strip of velcro on the bottom of the board (on what would be the 'front' side).

I then measured and drew lines across the board as above. You can make your slant board what ever dimensions you prefer, I wanted Squeak's work surface to be slighter larger than a sheet of paper so from left to right my sections measured: 35cm, 35cm, 8cm and 5cm. 
The third section is the 'rise' part of the slant board so make it as high as you want the board to sit.
As you can see on the far left of the photo there was excess board which I removed and kept for future projects.

Using the craft knife again I carefully scored through the top layer of the board along all three lines. Use the ruler for stability if free hand cutting is proving tricky.
Once the lines are scored the board can be bent in those places but still holds together securely.

Your board should now look like this once all of the sections are cut and folded.

On the underside of the smallest section attach the other side of your velcro.

Now your board can hold together using the two strips of velcro.

The girls love using the slant boards and the thick corflute is perfect - easy to cut but rigid and strong to support weight.

If your table surface is slippery you can add anti slip sheets to the back (the rubbery anti slip mats you can buy to go inside cupboards and shelves at the dollar shop would be perfect) or rubber stoppers which you can buy in packs at hardware shops. 
Ours sat on the table without slipping just fine though.

To help Squeak hold her paper steady while she works I attached a large clip at the top of the board using hot glue. It is large enough for her to open and close easily with her little fingers but small enough not to get in the way of her work.

These slant boards were so easy to make and for $7.50 each very cost effective!

Please note, I am not a specialist or therapist and my posts should not be taken as professional opinion. I am just a parent sharing what helps our child.